 | |
| Urban Beauty by Antoine Dagobert |
This time, let me share with you how to shoot outdoor in bright sun light and under the blue sky.
The important thing here is how to minimize the shadow and how to put the shadow that causing by the sun in right place. Good analyze and be smart with choosing your camera angle in order to maximize the benefit of the great sunlight are very important.
Harsh light of the sun can be benefit, but it can be also problem at the same time. With today software existences such Camera Raw and Photoshop and not to mention modifiers and others technologies inside the camera and the lens itself, the word "Impossible" almost none anymore. But I rather rely more on my own creativity instead of all the big gears. Because all the big gears will cost you big money too. Great if we have it...I will say LET'S GO FOR IT and HAVE FUN with it...but still my suggestion to you rely more on your creativity and deliver the same result with less money. :))))
In Photography, all is about painting with light and shadow. As I always say "Great Light determined by the impact of the Shadow and The Impact of Light balanced by the Shadow." So lets get creative!
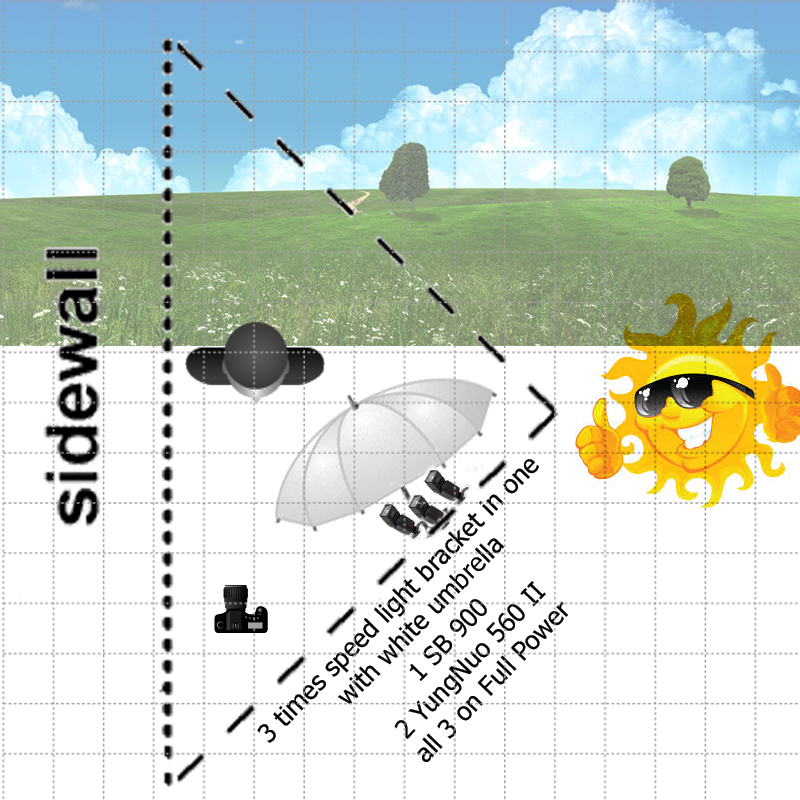
As you all can see on Diagram above..., I chose to avoid harsh sunlight by placing the sun on the right side of the model. I added creativity here with DIY (do it yourself) bracket, 3 flash in one by using a scotch tape. :))))

TIPS for this type of shot
- Determine your angle by avoiding the harsh sunlight. The best angle is by using the Sunlight as your side light. #kindaoldschoolmethode :)))))
- Placing your model align with your camera too.
- Choose the great blue sky for your background, great for contrast too. :)))))
- Placing the Speed light align inside the sunlight radius of curvature
- Use 3 speed light on full power with white umbrella to soften the power that produce by 3 speed light.
- F / Aperture; your control for background and at the same time control your speed light power.
- Shutter speed ; is your exposure control for your model.
- ISO for overall or balancing The Aperture and The Shutter Speed.
- Be creative with distance between the model and your lighting.
- Radio trigger for sync. your speed lights and your camera body. (transmitter for in the body and receiver for your speed light.)
on my image Urban Beauty one thing that is not quiet right, is the using of F/20. Which is produced to much details in the background. I prefer more blur or Bokeh will be great. Or if we want to go more extreme by using larger aperture as F1,8 up to F2,8, we need to use ND filter 8 or 16 perhaps 32 on our lens and we need to have also high speed sync. trigger system. But non of such was available at that time. So I guess choosing the F20 was not bad idea at all afterwards. :)))))
Here below result from several shot that I have made from this session. I put it in slide show from the setup up till after the post processing. #grabyourbeernenjoyit :))))
So that's all folks, quiet a long reading and writing this time, I do hope this article will help you on your next photo session/adventure.
Cheers and Ciao :)))))
Antoine Dagobert
All The Materials Contained May Not Be Reproduced, Copied, Edited, Published, Transmitted Or Uploaded In Any Way Without My Permission. My Images Do Not Belong To The Public Domain.
© Antoine Dagobert: using this image for any purpose and in any way, without prior permission, may lead to legal action.
#swag #zizzleblog #girly #fashionable #rings #boho #hot #bohemian #clubsocial #swagger #pants #lbloggers #fashionlove #fashionfollow #stylehunter #fashiondesign #trendhunter #britstyle #dailyoutfit #fashionweek #wiwt #britishstyle #longhair #fashionpic #lighting tuturial #photographytutorial
No comments:
Post a Comment